포스팅의 목적
이 포스팅의 목적은 Get방식이 아닌 Post, Put 등 데이터를 request body로 전달했을 때, interceptor를 통한 로깅이 목적이다.
우선 일반적으로 interceptor에서는 request body 데이터를 읽을 수 없다.
filter를 통해 request의 데이터를 읽을 수 있는 객체로 변환해서 보내줘야한다. 이것을 wrapping한다고 해서 wrapper class라고 한다.
Spring MVC life cycle의 이해
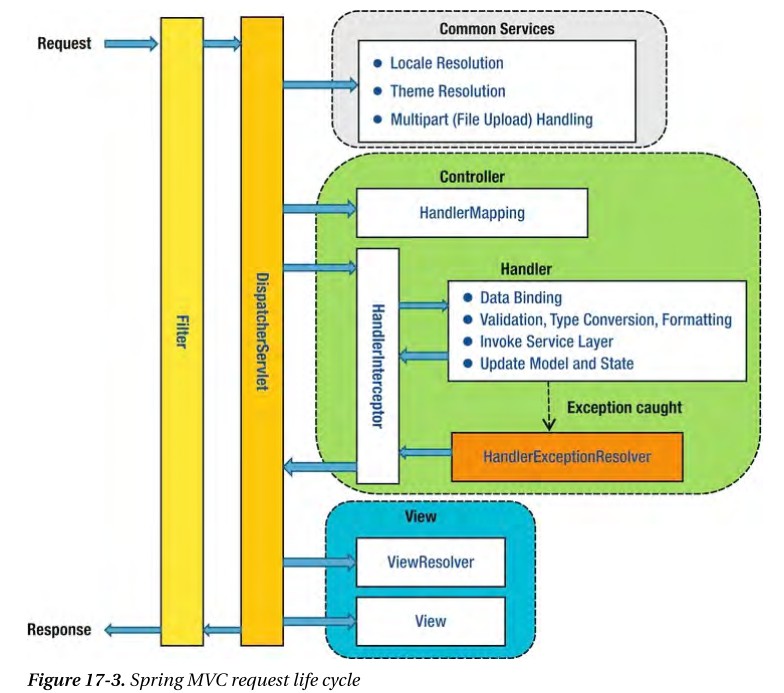
이미지 출처 : https://justforchangesake.wordpress.com/2014/05/07/spring-mvc-request-life-cycle
위 그림은 Spring MVC life cycle의 그림이다. 일반적인 순서는 다음과 같다
요청 -> 필터 -> 디스패처 서블릿 -> 인터셉터 -> AOP -> 컨트롤러 -> AOP -> 인터셉터 -> 디스패처 서블릿 -> 필터 -> 반환
그림에서 나타나듯이 Filter를 거쳐 DispatcherServlet을 지나서 HandlerInterceptor를 지나기 때문에 request를 wrapping 해주기 위해서는 filter를 거쳐 사용하는 수 밖에 없다. 즉, 필터에서 request를 래핑클래스로 감싸주고 이것을 인터셉터에서 사용해야한다.
Servlet Wrapper Class
래핑클래스를 직접 작성해도 되지만, 스프링에서 사용하라고 구현해둔 클래스들을 사용하면 간편하다.
org.springframework.web.util 패키지의 ContentCachingRequestWrapper, ContentCachingResponseWrapper 클래스들이다.
// CustomServletWrappingFilter class

@Component("customServeltWrappingFilter")
public class CustomServletWrappingFilter extends OncePerRequestFilter {

    @Override
    protected void doFilterInternal(HttpServletRequest request, HttpServletResponse response, FilterChain filterChain)
            throws ServletException, IOException {
        ContentCachingRequestWrapper wrappingRequest = new ContentCachingRequestWrapper(request);
        ContentCachingResponseWrapper wrappingResponse = new ContentCachingResponseWrapper(response);
        filterChain.doFilter(wrappingRequest, wrappingResponse);
        wrappingResponse.copyBodyToResponse();
    }

}
wrappingResponse.copyBodyToResponse(); 를 반드시 해줘야한다. 톰캣에서 response를 한 번 출력하면 데이터가 사라진다. 그렇기 때문에 response를 복사하면 클라이언트에 도달하는 response가 빈값으로 가게된다. 이를 막기 위해서 마지막줄에 있는 함수를 반드시 호출해줘야한다.
Interceptor 클래스
인터셉터 클래스에서는 request, response를 래핑클래스로 변환한다. 변환된 클래스로 데이터를 가져올 수 있다.
@Log4j2
@Component("dataCheckInterceptor")
public class DataCheckInterceptor implements HandlerInterceptor {

    @Autowired
    private ObjectMapper objectMapper;

    @Override
    public void afterCompletion(HttpServletRequest request, HttpServletResponse response, Object handler, Exception ex) throws Exception {

        final ContentCachingRequestWrapper cachingRequest = (ContentCachingRequestWrapper) request;
        final ContentCachingResponseWrapper cachingResponse = (ContentCachingResponseWrapper) response;

        if (cachingRequest.getContentType() != null && cachingRequest.getContentType().contains("application/json")) {
            if (cachingRequest.getContentAsByteArray() != null && cachingRequest.getContentAsByteArray().length != 0){
                log.info("request body : {}", objectMapper.readTree(cachingRequest.getContentAsByteArray()));
            }
        }
        if (cachingResponse.getContentType() != null && cachingResponse.getContentType().contains("application/json")) {
            if (cachingResponse.getContentAsByteArray() != null && cachingResponse.getContentAsByteArray().length != 0) {
                log.info("response Body : {}", objectMapper.readTree(cachingResponse.getContentAsByteArray()))
            }
        }
    }
}
필터를 등록하기 위해서 WebMvcConfigurer를 상속받은 config 클래스에 등록한다.
마찬가지로, 인터셉터도 같이 적용한다.
이 방법 외에도 @WebFilter등 어노테이션을 통해 등록하는 방법도 있으나, 필자는 이 방법을 사용했다.
@Configuration
public class WebConfig implements WebMvcConfigurer {

    @Resource(name = "dataCheckInterceptor")
    private HandlerInterceptor DataCheckInterceptor;

    @Resource(name = "customServletWrappingFilter")
    private CustomServletWrappingFilter customServeltWrappingFilter;

    @Override
    public void addInterceptors(InterceptorRegistry registry) {
        String[] STATIC_RESOURCES
                = new String[] {"/js/**", "/css/**", "/images/**"};

        registry.addInterceptor(userLogInterceptor)
                .addPathPatterns("/**")						// 인터셉터를 적용할 Path 패턴
                .excludePathPatterns(STATIC_RESOURCES);	// 인터셉터에서 제외할 Path 패턴
    }

    @Bean
    public FilterRegistrationBean filterBean() {
        FilterRegistrationBean registrationBean = new FilterRegistrationBean(customServeltWrappingFilter);
        registrationBean.setOrder(Integer.MAX_VALUE);			// 필터의 적용 순서
        registrationBean.addUrlPatterns("/*"); 						// 필터 적용 URI 패턴
        return registrationBean;
    }
}
spring security를 적용한 상태라면, 필터의 적용 순서를 최후로 변경해야한다.
SecurityContextHolderAwareRequestFilter가 ContentCachingRequestWrapper로 래핑된 데이터를 마지막에 래핑하기 때문에
인터셉터에 넘어간 리퀘스트가 최종적으로는 SecurityContextHolderAwareRequestWrapper로 래핑되게 된다.
그렇게 되면 인터셉터에서 사용할 때, ClassCastException이 발생하게 된다.
참고 사이트
1) spring - request, response logging
2) Spring 프로젝트 Interceptor로 request, response body json 값